Welcome to the Tetris Effect Advanced Community Guide! This is a comprehensive guide about some of the advanced techniques you can use to improve your gameplay. If you haven’t read our Beginners Community Guide, you can find that here.
- STSD (Super T-Spin Double)
- Trinity
- Fractal
- DT Cannon
- C-Spin (TKI)
- Anchor Set
- Donations
- Building at row 20 and beyond
- Enabling IRS and IHS
- Avoiding a block-out
- Use both rotations
- DAS
- Stacking
- Read NEXT
- Initial rotation system (IRS) and Initial hold system (IHS)
- Phases
- Phase-transition garbages
- Zone damage
- Stacking for zones
- Tetrises on the save
- Zone strategy
- (ST, TST tower)
- 9-0 Stacking
- 6-3 Stacking and freestyle T-Spins
- ST Stacking
If you’re looking to play faster, the easiest solution is to play more often and let the speed just come naturally. However, another thing you can learn to get your Tetriminos/min up is finesse.
Finesse is the ability to place Tetriminos using as few keystrokes as possible.
For instance, think about how you rotate Tetriminos. One common finesse mistake (or finesse fault) is relying only on one rotation button. Sure, you can still get your Tetrimino into position most of the time with one rotation button, but you can also save a lot of time by using the other rotation button in certain situations. After all, three 90 degree rotations clockwise is the same as one 90 degree rotation going counter-clockwise.
Another thing to keep in mind is DAS vs. tapping. You can easily shift your Tetriminos to the sides with DAS, but in some situations, it’s actually better to only press the movement keys once or twice.
For a great Finesse training tool, try Tetresse (https://tetresse.harddrop.com/). Any time you perform an error regarding finesse, your current T-Tetrimino will reset and Tetresse will give you the set of inputs you need to perform the optimized amount of keystrokes. It’s a good idea to go a lot slower than your normal play speed, just so you can get the hang of all the things you need to do.
A key part of battle Tetris is to recognize patterns that can become strong attacks. By recognizing the best patterns from a given board state, one can achieve strong attacks that could help win the match. Tetris has several patterns that can be seen and used, a lot of which are detailed below.
STSD (Super T-Spin Double)
Overview:
A Super T-Spin Double, more commonly known as STSD, is a common T-Spin setup that can grant you two T-Spin Doubles back to back.
An STSD has 2 requirements
- A 2×2 empty square, with blocks surrounding it, except for one — this is where the first T-Tetrimino will be kicked into.
- 2 overhangs: the first is used to surround the empty square, and the second a block above the empty slot. The second one is used to kick the first T-Tetrimino.
Once you have an STSD setup, you can use a T-Tetrimino to spin it. If you are familiar with a T-Spin triple, this setup is very similar to that, with the exception that there is an extra hole in the stack that forms the square. If done correctly, you would be left with a TSD that you can follow in quick succession.
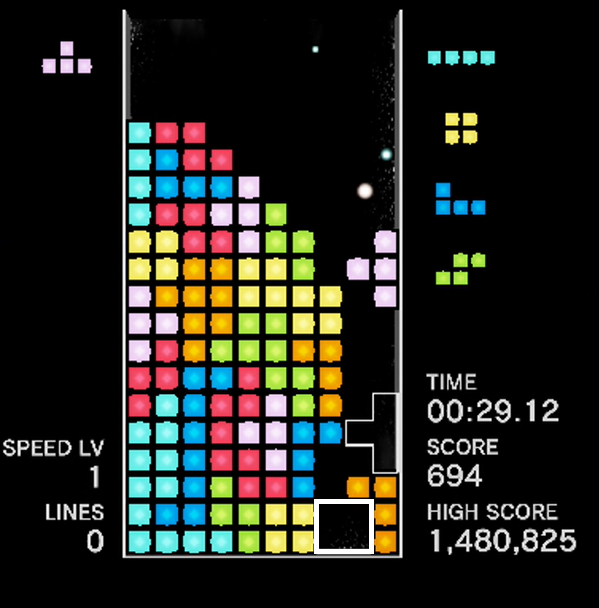
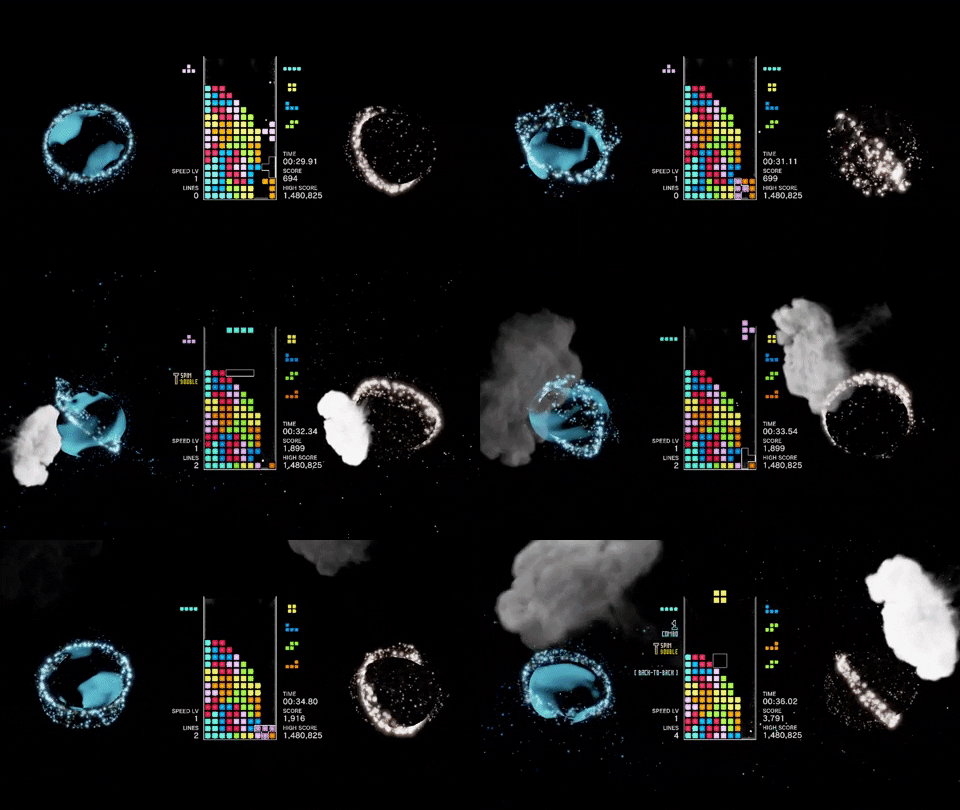
In the example above, the T-Tetrimino begins in the counterclockwise position. Once it hits the lower overhang, rotate clockwise to have part of the T-Tetrimino underneath the higher overhang, and rotate clockwise again to kick the T-Tetrimino into the square. After the T-Tetrimino clears two lines, forming the TSD, you are left with a normal TSD.
STSDs work because the square shape is either surrounded by Tetriminos (except where the T-Tetrimino gets kicked into) and the board. When going for STSDs in matches like Connected/CVS and Zone Battle, you can run into the chance where incoming garbage can ruin your setup.
The STSD’s square requires a Tetrimino/the board to be underneath where the T-Tetrimino would be kicked into or it to work. If it does not work, then the spin isn’t recognized.
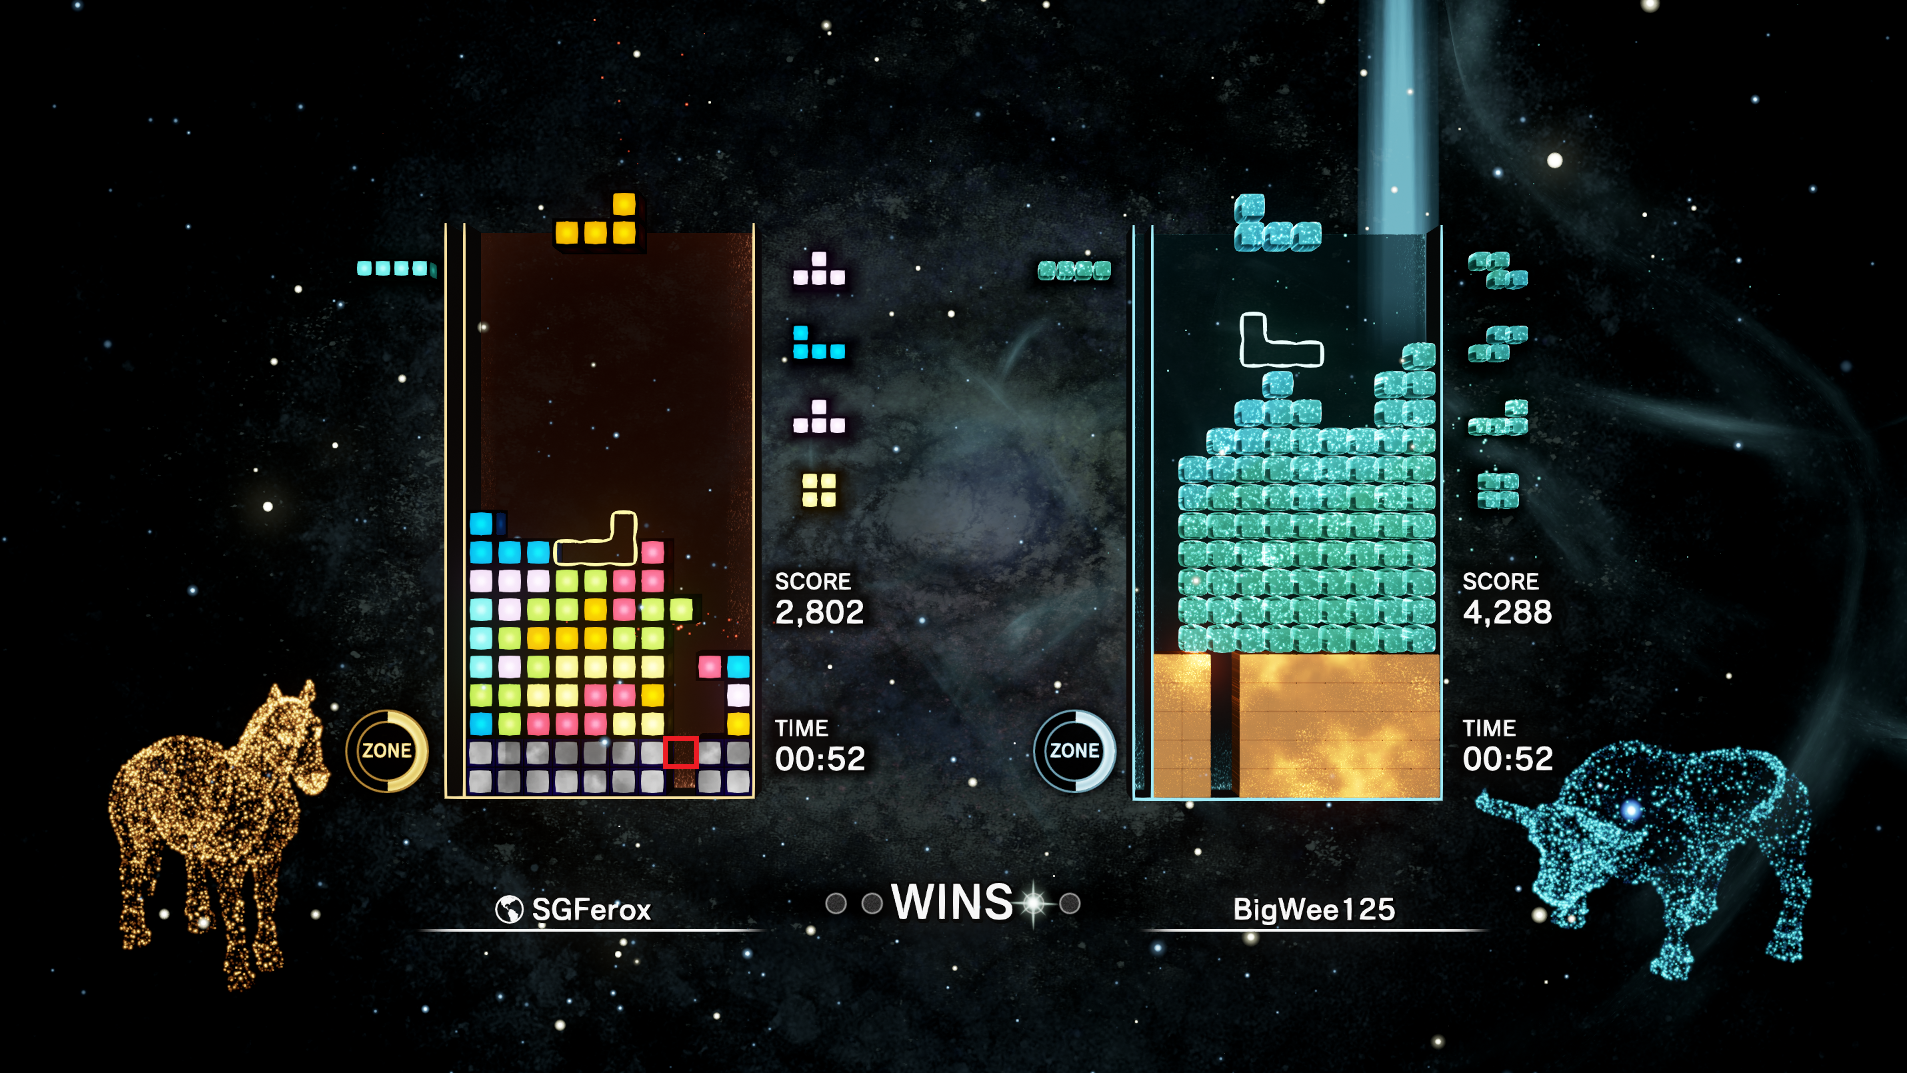
In this case, the square in red is empty. The T-Tetrimino here would fall one more row, and not only would this clear one line, but this would also only be considered a single, and not a T-Spin single.
When this happens, you can still save a T-Spin by using a J/L Tetrimino, and performing a J/L spin, called a Boomerang.
In the case on the right, you use the L Tetrimino and spin it like you would spin a T-Tetrimino here. This is called a Boomerang, and it saves you a TSD.
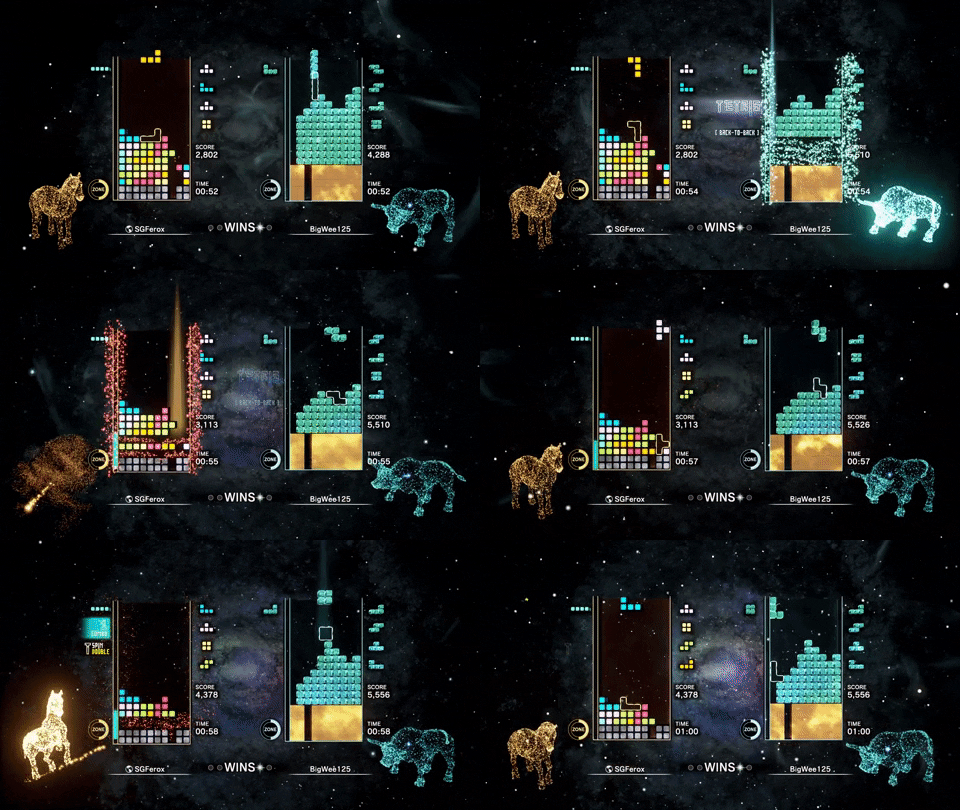
How do I make a STSD?
The most simple method is to convert a 3-wide into one. In this method, you need to make sure that the 4th column (or 7th, if you have a 3-wide on the right) must not be too high.
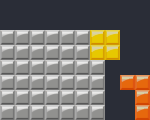
Place an L or J upside down in the well, and place an overhang.
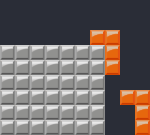
If the 4th column is too high, you need a more specific overhang, which is not ideal if you have a L/J drought after the first L/J dropped. In this case, you need 2 Ls.
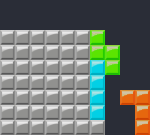
If the 4th column is too low, you need 2 or more Tetriminos to fix it.
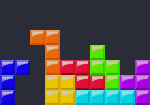
While it’s not really the best option, you can do STSD with a certain first bag. It’s good for practicing though.
Trinity
A trinity is another T-Spin setup that grants you three T-Spin Doubles. It is built by having a regular TSD, with an STSD setup on top of the TSD.
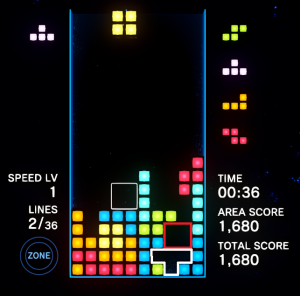
The trinity is formed in the bottom-right of the board. The first T-Tetrimino would be placed where the white outline is at, and that leaves the 2×2 square that makes up the STSD.
Once the trinity is set up, the first T-Spin is simple: kick the Tetrimino like how you normally would an STSD (in the picture above, the T-Tetrimino starts in the clockwise position, and rotated twice counterclockwise to be kicked in), but with the addition of another rotation in that same direction. As for the example above, after kicking the T-Tetrimino, rotate counterclockwise once more.
It is possible to rotate in the opposite direction once the Tetrimino is kicked in, and in this example, a T-Spin triple would be formed instead of a T-Spin Double.
Fractal
A fractal is a T-Spin setup where you place a regular T-Spin Double on top of another T-Spin Double. When you clear the first T-Spin Double, the overhang that created that TSD becomes the overhang of the new TSD.
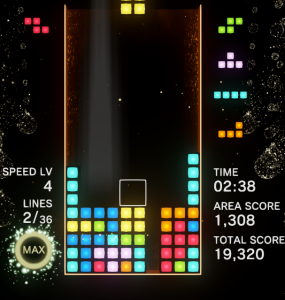
Fractals are easier to set up if your stack is flat.
When setting up fractals, a key thing to remember is that a one-row high overhang must be on both sides of the final T-Spin location (as shown in white below). Every Tetrimino except O can be used to create such overhangs, as long as there’s enough space.
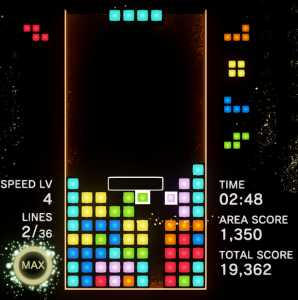
T-Tetriminos can be used to set up fractals, as they can create a one-row high ledge. However, you do waste a T-Tetrimino when doing so, which can be an issue if you don’t get another soon.
Once the overhangs are set up, then you are able to create another T-Spin Double by creating an overhang on one of the sides (in this example, the overhang is on the right).
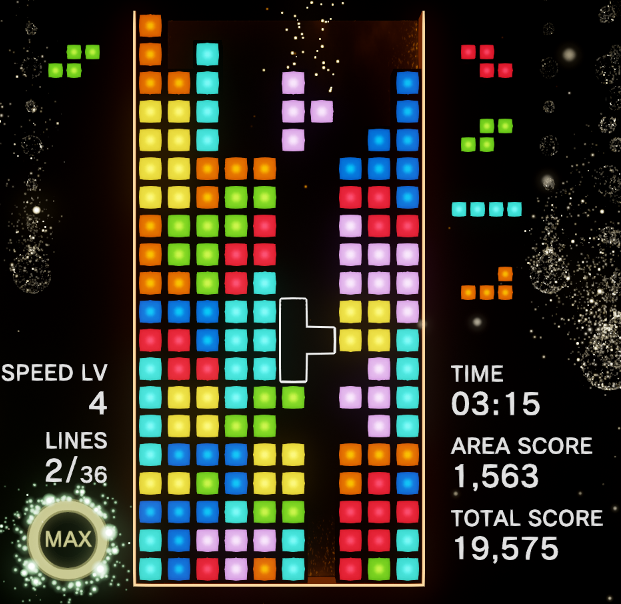
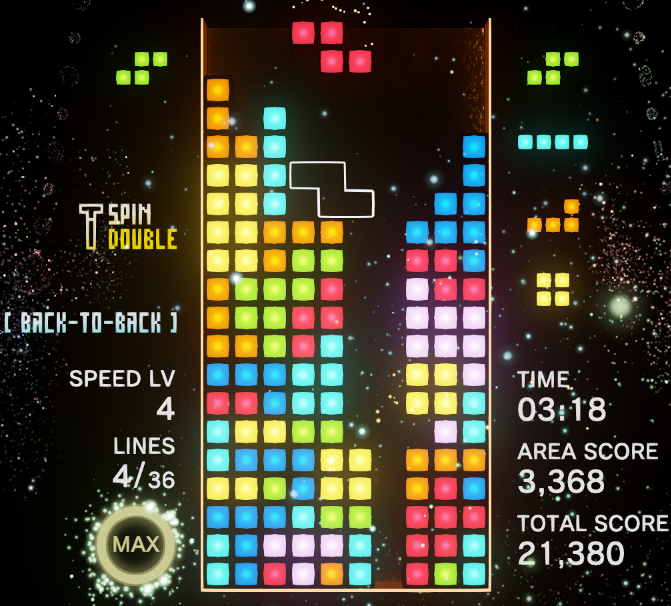
Once the first T-Spin Double is done, the overhang is used for the next T-Spin Double!
DT Cannon
A DT Cannon is a T-Spin setup that grants you a T-Spin Double and a T-Spin Triple in rapid succession (DT = Double Triple).
A DT Cannon is made by essentially splitting a T-Spin Triple in two, and having a T-Spin Double sandwiched in between the two. In the example shown below, the T-Spin Double is in yellow, and the two T-Spin Triple halves are in Green.
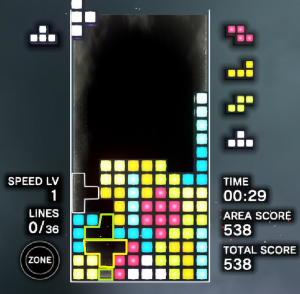
Once the T-Spin Double is cleared, a T-Spin Triple is formed.
An easy way to spot and set up a DT is by having a flat stack. In the example from the Fractal category, a DT can be made by placing an S Tetrimino flat on the left to create the initial overhang, an L Tetrimino counter-clockwise on the right side of the well, and a J Tetrimino clockwise on top of the S Tetrimino.
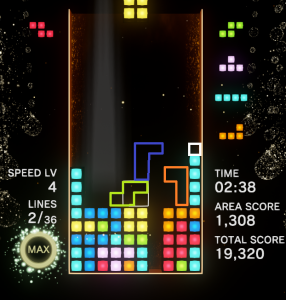
Don’t forget about the right wall! Because the kick won’t work with a one-tall wall, make sure the white square is filled. A common way is to use a vertical I Tetrimino there.
In general, if you have an overhang for a T-Spin Double, see if you can place a one-block overhang two rows above the other side (J and L Tetriminos work great for this), as well as a higher overhang that is four blocks above the well.
The T-Spin Double is cleared first; similar to the trinity, spin the T-Tetrimino in the same direction as you did to kick it to clear the T-Spin Double. This leaves a T-Spin Triple that can be cleared.
Do note that this leaves an overhang that you eventually have to fix — this can be done by tucking a Tetrimino underneath, clearing the overhang with lines, or setting up an anchor set.
How do I make a DT cannon?
DT cannon takes the following general form:
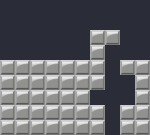
It is a 1-6-2 type hole. Making this might be difficult at first, but if you have a clean 2-garbage hole, then this becomes very easy to set up.
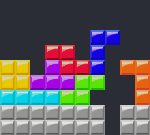
S(or Z if you’re on the other side), J, L are the only Tetriminos required for this setup.
C-Spin (TKI)
A C-Spin is a T-Spin setup that grants you a T-Spin Double and a T-Spin Triple that can be fired in rapid succession. The shape formed to create the T-Spin Triple looks like a C, hence the name. This is the opener referred to as “TKI” in the Japanese community, named after the player who first used it. However, western players refer to a different opener when discussing TKI.
It is similar to a DT; however, the T-Spin Triple is done first, which fixes the overhang problem by clearing a T-Spin Double with it.
In this case, the T-Spin Double is split in two, with a T-Spin Triple sandwiched in between. A good way to visualize this when trying to create a C-Spin is by placing a T-Spin Triple where your well is, then shifting it one column in either direction.
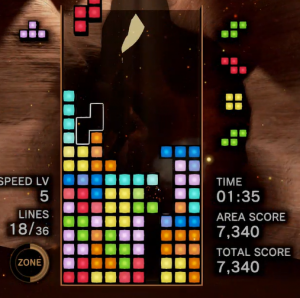
Here is an example of the C-Spin. The combination of the I, O, and most of the S Tetrimino creates the left portion of the T-Spin Triple where the T-Tetrimino is placed, while the J on the right creates the overhang used for both T-Spins.
How do I make a C-spin (TKI)?
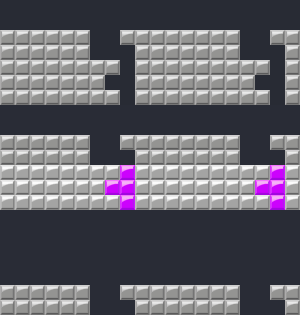
The logic behind C-spin is simple. As we know, after a T-Spin triple is formed, it will leave an overhang (the bit on the right).
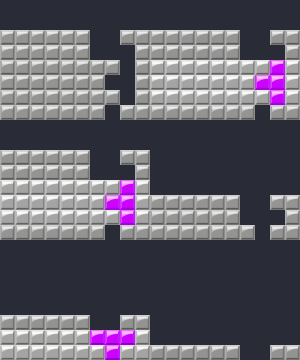
Then we just use this overhang to conveniently create a TSD.
One common scenario is that you are on top and you need some powerful attacks to hold off the opponent and recover. You can use the garbage hole at the top, and build a TST upon that.
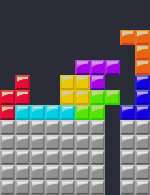
Use L and J to create the overhang, and use S to block the hole. T and O are used to create the TST shape.
This is also how you create the TKI opener. There are a lot of variations available, but you should keep the key points in mind first.
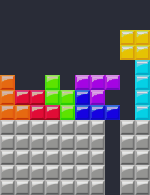
Blocking the garbage hole directly instead of increasing the height is also a solution, though it can be slightly messy to set it up.
Anchor Set
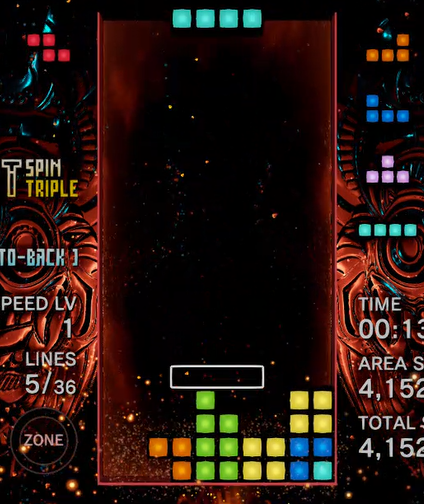
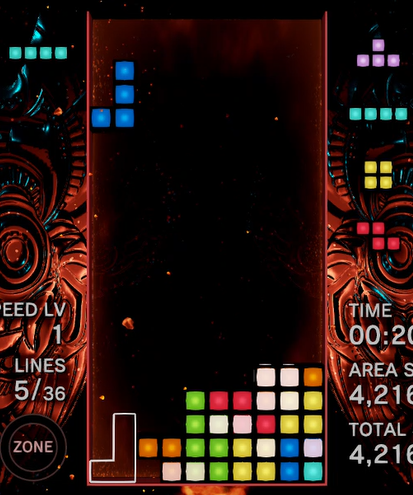
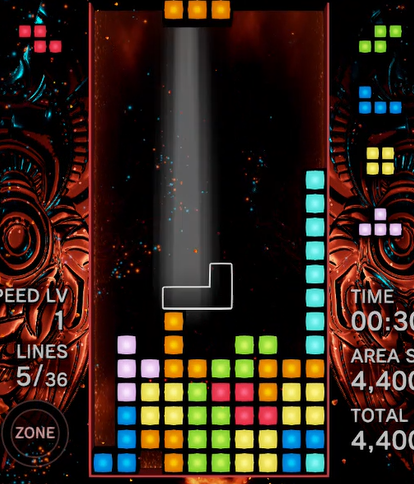
When left with an awkward overhang, a good way to deal with it would be to use something like an Anchor Set.
In this example, after clearing a T-Spin Triple, one is left with an overhang. You can completely avoid having to fill in the gap by placing a J Tetrimino as seen below. This sets you up for a Tetris and opens the well!
Donations
Donations are done by temporarily covering up a well to perform a T-Spin. The well is opened back up once the T-Spin is done. For most donations, you spot a T-Spin hole in the middle of your stack and donate a particular Tetrimino over your well.
Here, you can set up a T-Spin with a J and use a T as the overhang. You can then place an O on the right to complete the donation. After the T-Spin, the Tetris well is open again.
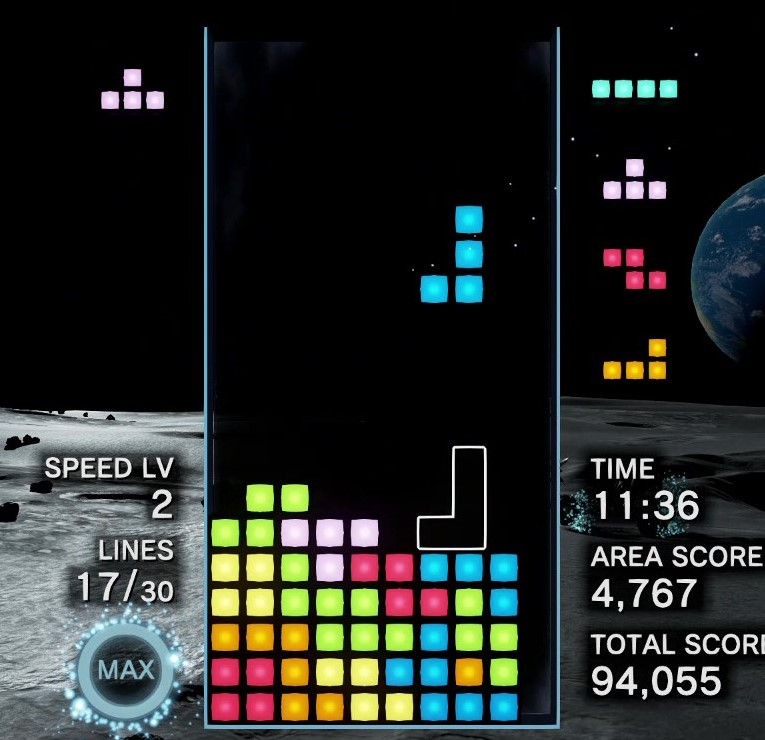
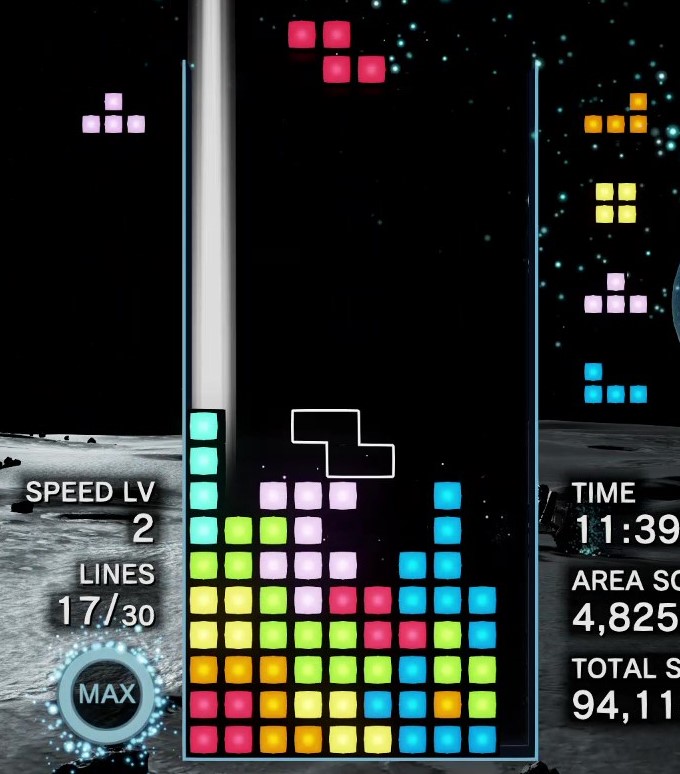
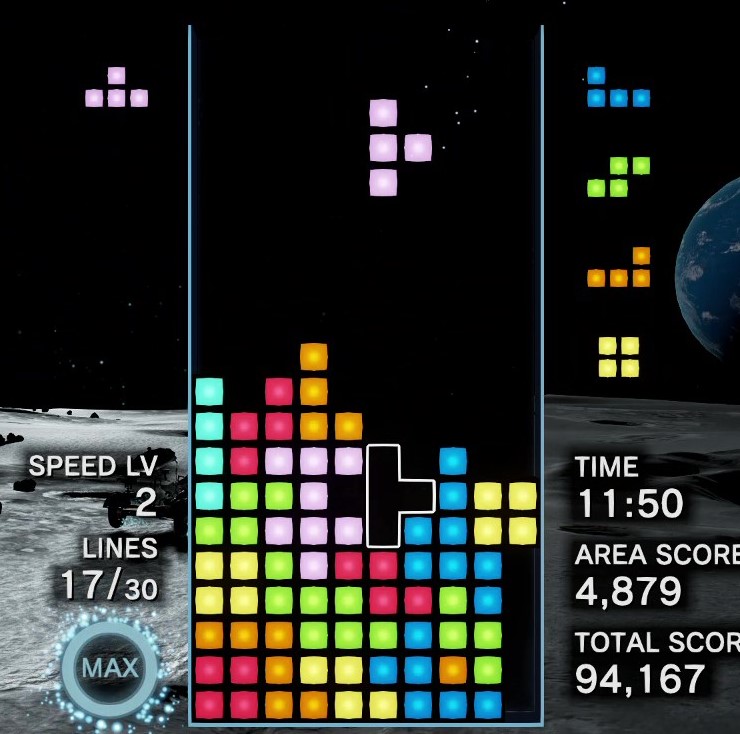
In this example, it’s better to donate an S first, and then use a Z as the overhang afterwards.
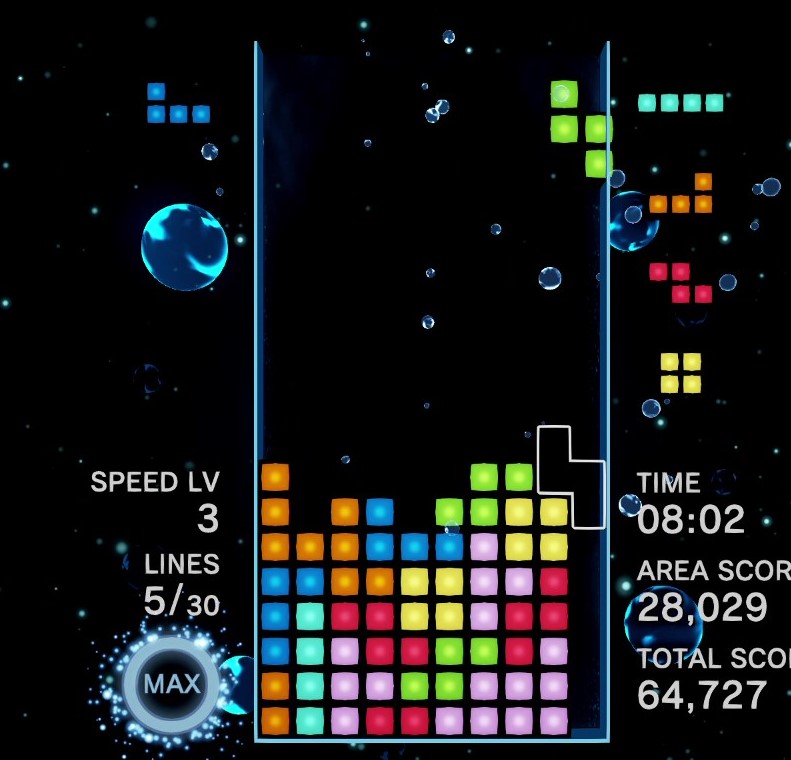
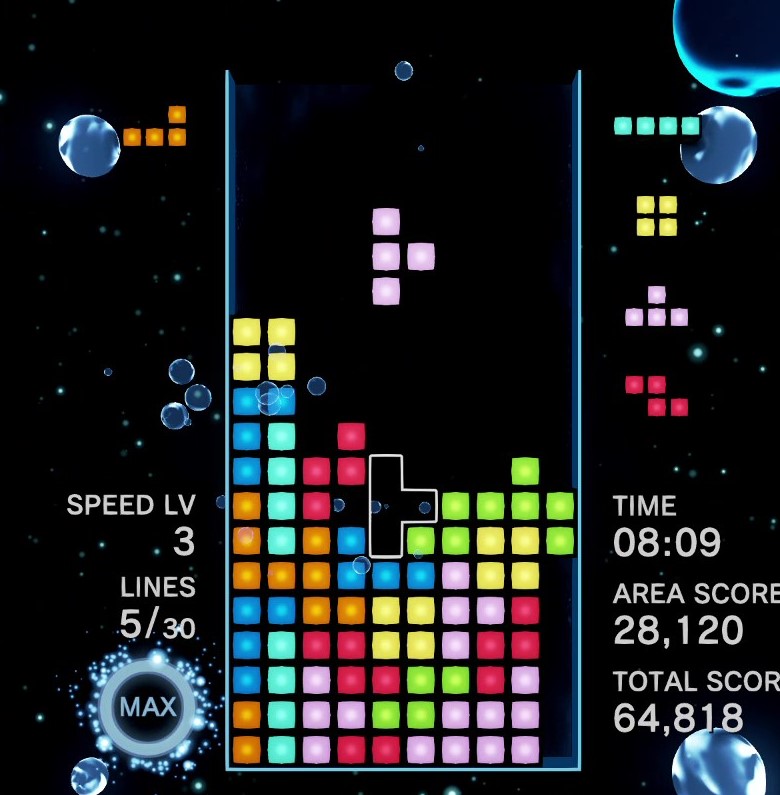
This donation, called a kaidan, is quite a common one. If you spot this staircase pattern, you can donate a vertical Z (or on the left side, a vertical S), and finish the T-Spin with an overhang.
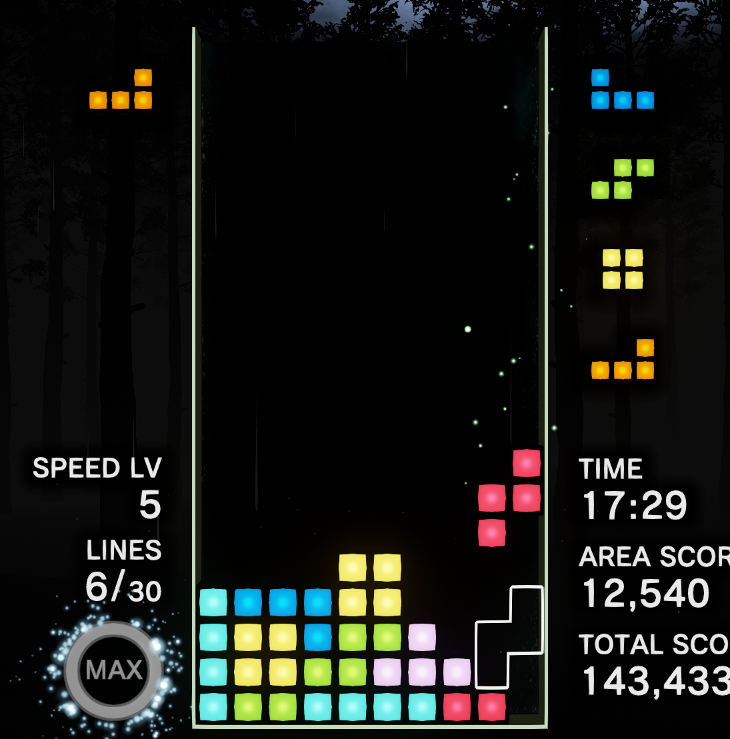
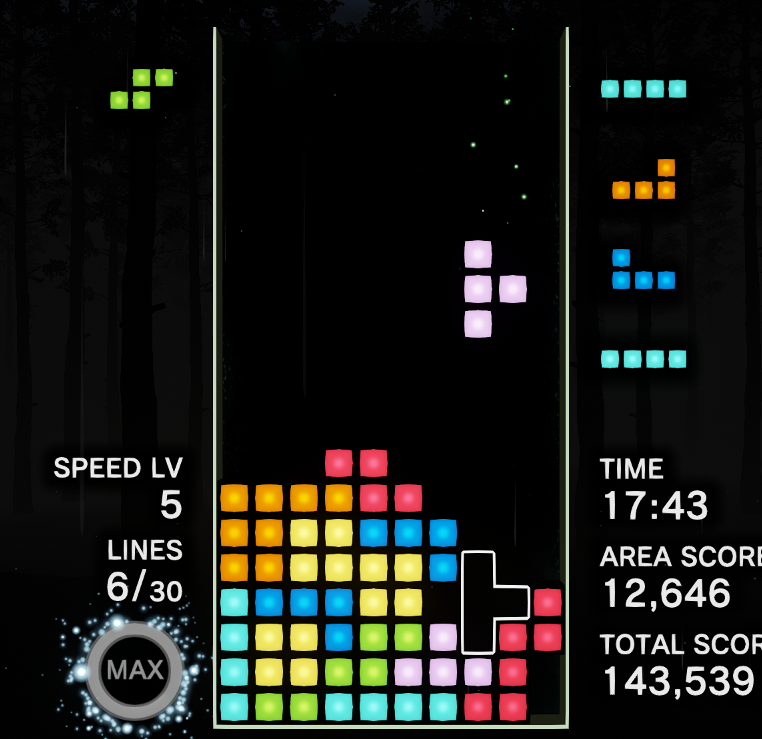
Donations are a great way to spice up traditional 9-0 stacking and can be done with any Tetrimino or even combinations of Tetriminos if you get creative enough.
In Tetris Effect, clearing large Zone clears is a goal many go for, whether this is in order to deal large damage to opponents in Zone Battle, or simply as a singleplayer challenge. While fairly conventional strategies can be used to achieve up to 19 lines, clearing 20 or more lines is possible and requires a good understanding of the mechanics at the top of the field. Clearing this many lines grants significant bonuses to damage in Zone Battle, and a shot at the leaderboard in singleplayer.
Building at row 20 and beyond
At the top of the board, Tetriminos placed are in danger of locking out, ending your zone. When a Tetrimino is placed entirely above row 20, it will lock out and your zone will end. However, you are able to stack beyond the 20th row if at least one block of the Tetrimino rests on or below row 20. This means that you can place Tetriminos on your matrix to stretch your stack up to lines 21, 22, and even 23. The main use for this technique is to allow for Kirbtris (21 Zone Lines) and Impossibilitris (22+ Zone Lines) setups, but stacking Tetriminos at this height can also help in securing Ultimatrises in Zone Battle, which offers a damage bonus and a special sound effect when cleared.
To visualize the location of row 20, note the matrix border. The sides of this border only extend up to line 20. The boundary between lines 20 and 21 has been indicated in the image to the right with a dashed line. Tetriminos can be placed anywhere in this area as long as at least one of their blocks hangs below this boundary. Three are shown here, rising up into rows 21, 22, and 23. Note that each Tetrimino has at least one square below the line, marked with an X.
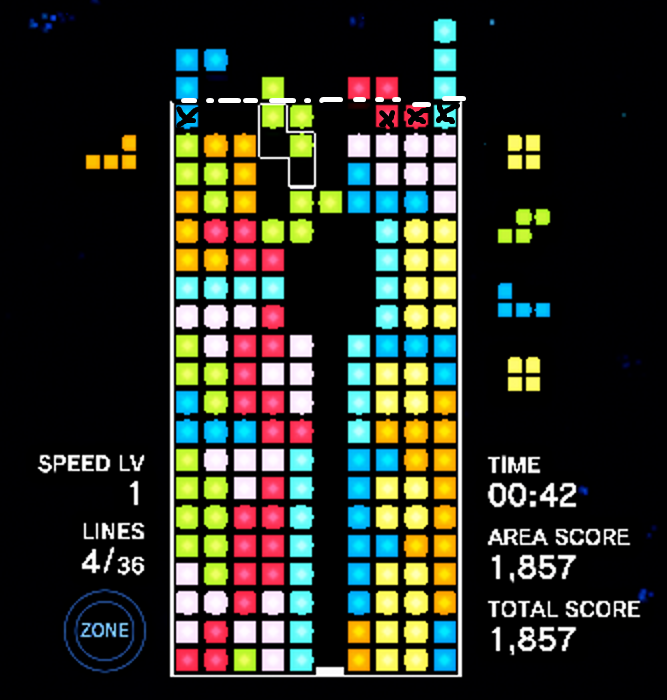
When building high in the Zone, it is vital to make sure that the shapes your Tetriminos make will fill in correctly without locking out. Many setups will fill these rows in smoothly, but if you aren’t careful, you can create a stack that is impossible to complete without locking out.
Initial Rotation System (IRS) and Initial Hold System (IHS), are mechanics included in Tetris Effect that allow for extra survivability at the top of the board, which can be used to build cleaner, higher, and send larger zone attacks during battle. However, you must use Type A IRS for this to work, as blockout is checked when the previous piece is placed, not when the piece is spawned, and Type B cannot bypass this check. IRS and IHS are performed by holding a rotation button or hold button as the previous Tetrimino is being dropped. By holding the rotation button, the Tetrimino that spawns in will appear pre-rotated CW or CCW, depending on the respective rotation button that was held. By holding the hold button, the next Tetrimino to appear in the matrix will be swapped for the Tetrimino in the hold queue instantly. You can combine these techniques to spawn in the Tetrimino in the hold queue pre-rotated, even if the Tetrimino in your next column would ordinarily top you out.
Also note that Initial Hold System is more restricted than Initial Rotation System, and is not always possible to use. If hold has already been used, pressing it again will not do anything, allowing IHS to be buffered successfully. However, if the current Tetrimino has not been held, trying to use IHS will bring out the hold Tetrimino before the current Tetrimino has been placed. Game over is checked immediately after placing a Tetrimino, so there is no window to time a hold input after placing the current Tetrimino either, making Initial Hold impossible to use in this situation.
Enabling IRS and IHS
IRS and IHS are off by default. To turn on these two mechanics (among others), you will need to go to the Options menu. Assuming default keybinds, this can be reached by using the F1 key on a keyboard or the pause button on the controller.
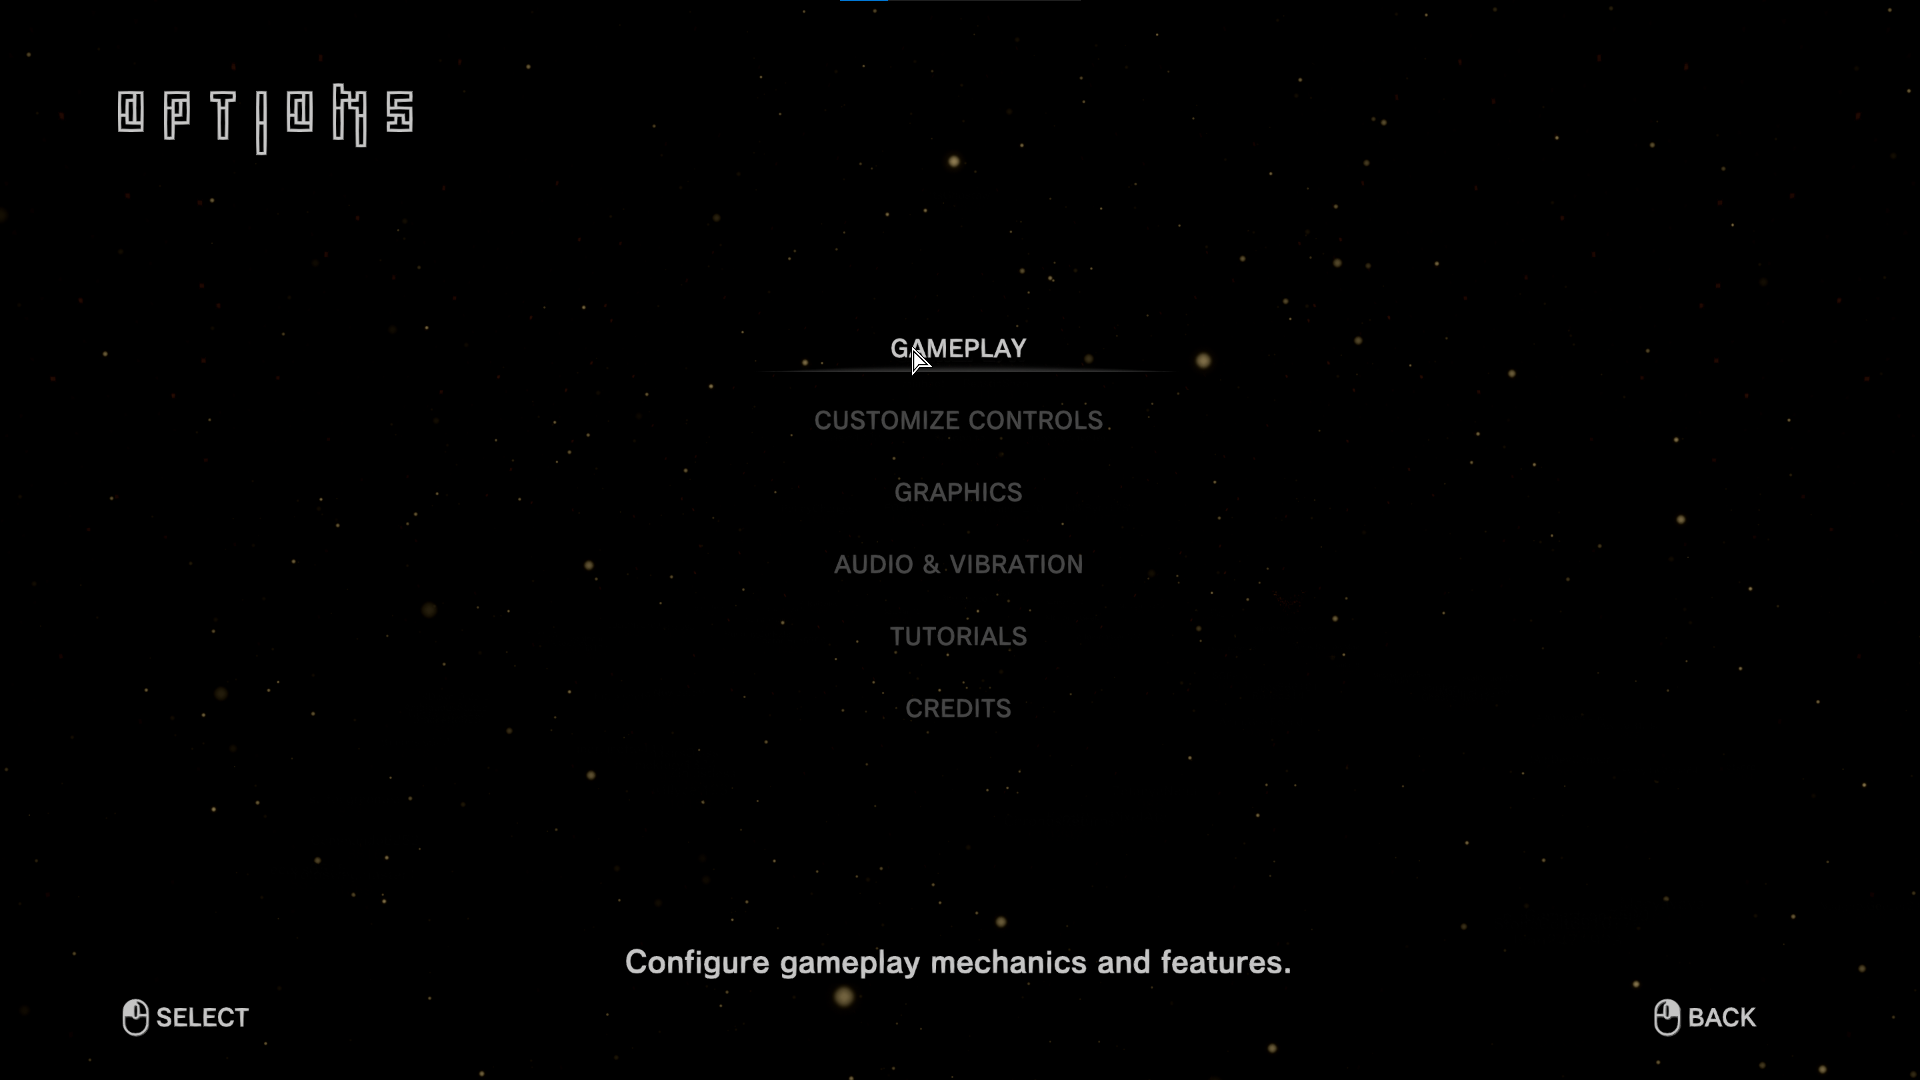
From here, go to Gameplay:
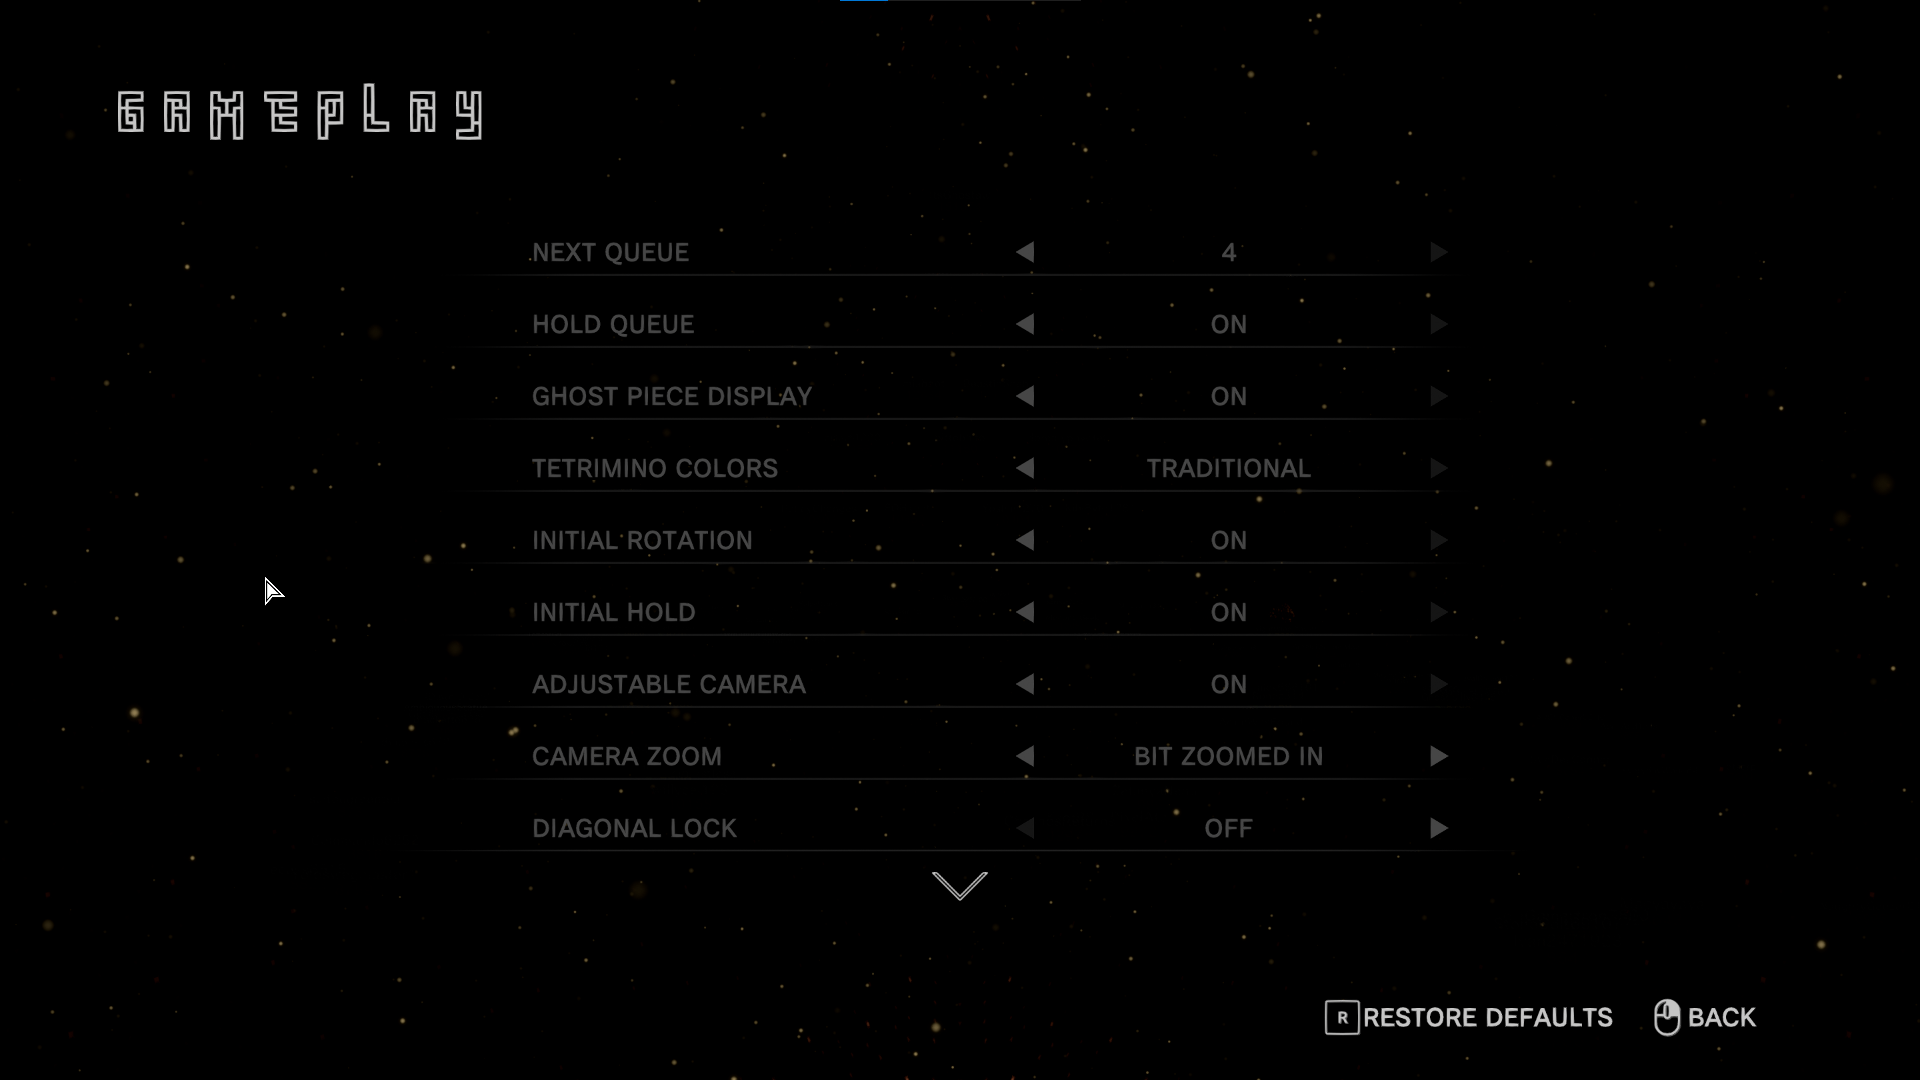
Initial Rotation and Initial Hold are found in this menu.
(While you’re there, you can also change some other options – for instance, a longer Next Queue can assist with speed and openers, Diagonal Lock may be useful in a VR environment without a standard gamepad, and Camera Zoom is a generally useful singleplayer feature. Find the best options for you!)
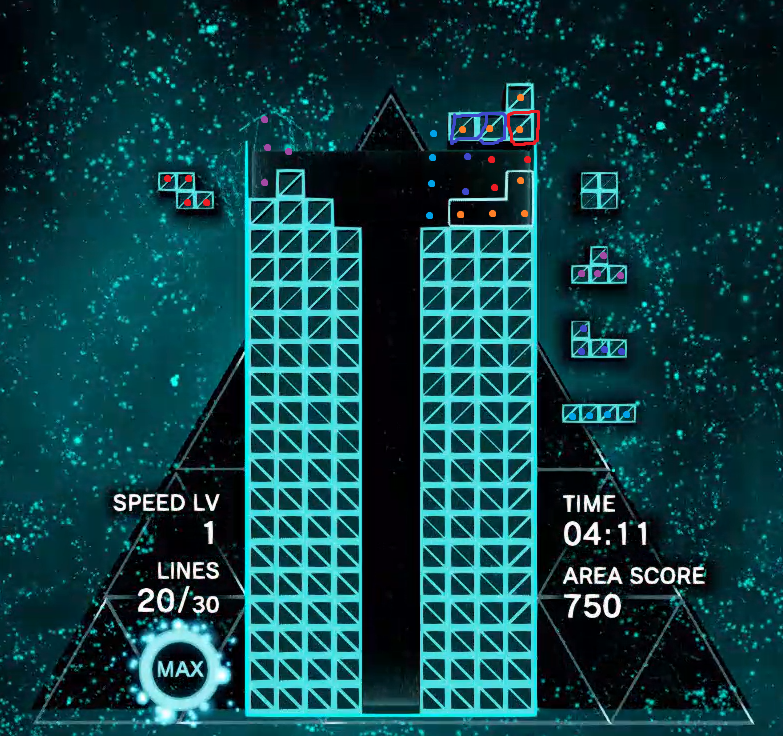
A technique useful for clearing an Impossibilitris (22+ line zone clear) involves building between columns 1-4 and 7-10. When doing this, use the clockwise IRS to avoid topping out and build high enough for a larger zone clear. On the left side, the L, Z, J, and I Tetriminos can be stacked to top off a 21-high stack to the right of the center columns in the image below. Note that this setup would work to set up a 22-high stack if the right side was one row higher, although it would not be able to set up a 23-high stack since the J and Z Tetriminos would be completely above row 20 and force a top-out. If the T Tetrimino is placed as indicated on the left, can you find a way to set up a 21-high stack on the right with two additional Tetriminos? There is more than one way to do so…
Avoiding a block-out
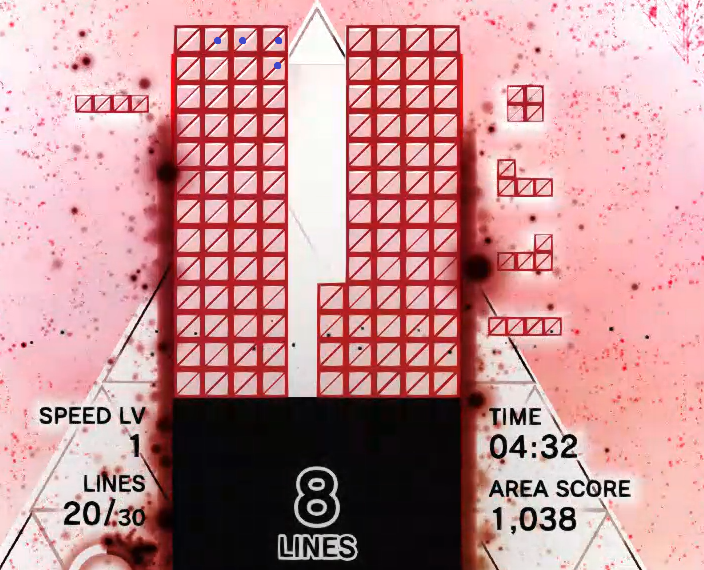
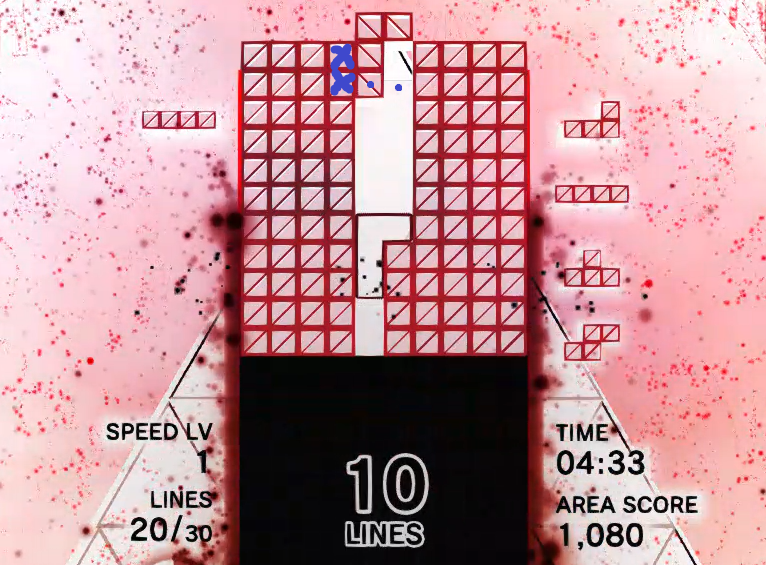
An important thing to be careful of when setting up and clearing zone attacks higher than perfectris is that Tetriminos may not have room to enter the matrix in their default rotation, but by spinning the Tetrimino before entering the field, it can spawn in the field without conflicting with what is already built. Note that after completing the 21-line stack to the left, the middle two columns are the only ones left open. You may think that the O-Tetrimino is the last Tetrimino able to spawn in, but by holding the rotate CW button, the J can rotate to its position in the right image. Note that if it were not initially rotated, the two blue Xs would cause the J Tetrimino to conflict with the stack and end the zone earlier.
A more detailed guide to clearing an Impossiblitris can be found here.
As your playing goes further, you will be presented with more challenges, including this instant gravity section. 20G is presented in some sections of Expert difficulty of Journey mode, Master in Effect mode, and Score Attack in multiplayer after level 20. There is also some boss in Connected that will have this.
So, how do you tackle this? There are some of the basic tips:
Use both rotations
You probably play Tetris and use the ↑ key or B button to rotate clockwise, and don’t use counterclockwise rotation often (the ‘Z’ key or A button). This is bad, as even with lenient SRS, there are still some moves that cannot be done with only clockwise rotation.
One of the first things you need to learn is that the counterclockwise rotation of J will still be flat:

If you clockwise rotate it 3 times, you will be in some trouble if your stack is too bumpy, as the complex SRS rotation table might lead you somewhere else. Luckily enough, as TE:C follows ordinary guideline rules (your lock times got reset for every move you do, up to 16 tries), in most cases, you’ll still be able to get out by rotating clockwise 3 times, but you don’t have that lucky after the lock delay shortens, so it’s the best to learn now.
More worse case being that SRS will just ruin your day:
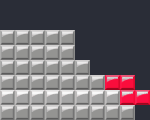
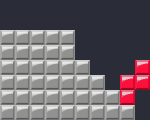
This move can only be done using counterclockwise rotation.
If you managed to make it rotate twice before, then both rotations can be used to achieve this position.
This is one of the common playing traps that will cause problems.
There are more counterclockwise movements, but I’ll leave the “most important one” here, and leave most of them for you to uncover. Be sure to apply these to your gameplay!
DAS
Tapping in 20G is awful, like very awful. Tapping is inconsistent and tiring. This is why we need to get DAS working for you.
If you’ve noticed, there is a short time gap between the Tetrimino placed and the next spawned. This interval is called the entry delay, or usually called ARE (a term in Japanese indicating “that” gap). This is a gap where you can charge your movement, so when the Tetrimino comes out, it will automatically shift in that direction.
Note that, you need to hold for a short time in order for DAS to come out.
20G SRS Wall Finesse has a list of common situations that you might encounter in 20G.
Stacking
The general stacking tips are still the same: keep it as flat as you can. This does work well in SRS, but to gain more freedom in movements in 20G, we need to learn a new stacking method, called pyramid stacking. This is not required but strongly recommended.
As the name states, you need to maintain a pyramid shape in your stack, so more free movements can be made. A general rule of thumb is
keep the 5th column the highest
The reason for this is that when the Tetrimino drops, all the Tetriminos will fall on the 5th column, so if that’s the highest place, you can freely move the Tetriminos to both left and right without any trouble.
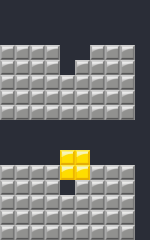
![]() I don’t like this.
I don’t like this.
You don’t need to make an exact pyramid, since Tetriminos like O and J might have problems finding a suitable place if you’ve done that. Just keep the 5th column the highest and you’ll be good.
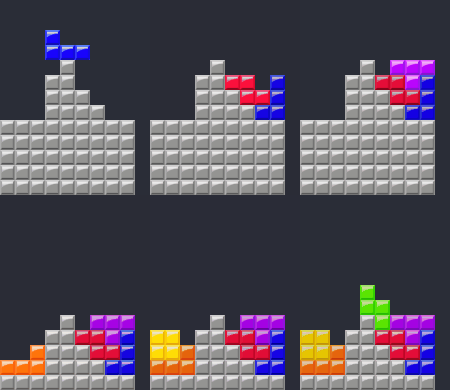
It is essential to practice these movements.
Read NEXT
20G does not have a ghost Tetrimino function for you. When you see the Tetrimino on the ground, it’ll be too late. But if your movement gets fast enough, you’ll get more time to look at the NEXTs. Remember,
Time saved on Tetrimino manipulation is time available to think about the Tetrimino position.
If your goal is to clear the whole Master Mode (if you want to be the next in the list), you need to be able to at least read 2 NEXTs continuously, even in the ending sections (M27 onwards).
Initial rotation system (IRS) and Initial hold system (IHS)
Some experienced players might wonder why you put such an important game mechanism so far behind. It is because SRS already gives you a powerful rotation, making IRS less useful. Though they are definitely a necessary tool for improving speed.
Initial rotation system (IRS) works just like DAS: you hold a rotate button in the spawn delay, and then the Tetrimino will come out pre-rotated to that direction. Initial hold system (IHS) is similar: you hold the HOLD in spawn delay and the Tetrimino that comes out will be the one in the HOLD slot.
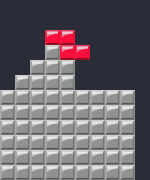
It is impossible to move the Tetrimino to the left using either rotation.
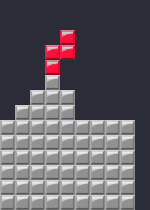
With IRS counter-clockwise, you can achieve this position, which allows you to move freely to the left.
…though you might just put this on the right and try to fix it.
It should be noted that IHS/IRS works differently from DAS: rather than the need to hold the direction for a certain amount of time, you can hold the rotate/hold for any amount of time; provided that you are still holding the button when the Tetrimino spawns, you can get the Tetrimino rotated/in hold.
Now the overall playing procedure became
- hard drop
- see NEXT and decide placement
- charge DAS, hold rotation, or hold HOLD if needed
- rotate and tweak
…and repeat. Holding multiple buttons might feel unnatural at first, but you’ll get used to it.
Phases
An important feature in Zone battle is the phases. As the game progresses, the garbage will get messier, making survival harder. Below is a table about how each phase changes things.
| Phase 1 | Phase 2 | Phase 3 |
|
Your starting phase. You need 6 line clears for each quarter zone charge. Each quarter zone lasts 5 seconds. Garbage is very clean. |
The phase transition happens when one of the players hits 20,000 points. You need 8 line clears for each quarter zone charge. Each quarter zone lasts 4 seconds. Garbage is messier, but big clears (Tetris, TSD) will still send clean garbage mostly. |
The phase transition happens when one of the players hits 60,000 points. You need 10 line clears for each quarter zone charge. Each quarter zone lasts 2.5 seconds. Garbage is very messy. |
Phase-transition garbages
Even if you are underpowered by your opponent, you can still make a comeback in between the phases.
The strategy is simple: when either you or your opponent are close to the phase threshold (20k and 60k), activate the zone. After the zone attack is sent, if you do enter the next phase, the garbage messiness will be the messiness of the phase you are entering, forcing the opponent to use Zone to block the damage immediately (especially in phase 3), giving them less time to stack.
Zone damage
The formula for zone damage is
The damage you would normally send + line bonuses
So either creating a good pre-zone stack or doing high-line clears will help you do more damage.
The line-clear bonuses table is as follows:
| Zone amount |
Line-clear bonuses | ||
| Under 19 lines clears | 20 | 21 | |
| 25% | ⅔ * (amounts of line cleared) rounded up | 14+4 | 14+10 |
| 50% | amounts of line cleared | 20+4 | 21+9 |
| 75% | 1.2 * (amounts of line cleared) rounded down | 24+4 | 25+11 |
| 100% | 1.5 * (amounts of line cleared) rounded down | 30+4 | 31+15 |
It should be noted that, while high line clear is good, time spent in Zone is also important. Leaving long zone time means your opponent gets more time to clear up the board/stacking to defend more damage.
Stacking for zones
Before entering zone, there are a few ways to stack your board to get an optimal attack.
- Combos
Using Combo setups (2-, 3-, 4-wide) are not as effective due to their lower attack output; as such, a focus on efficient T-Spin and Tetris setups would be better suited for Zone damage. However, combo setups, if performed fast, will result in a quicker Zone finish, giving your opponent less time to react.
- Tetris-T-Spin hybrid
Such stacks would usually involve a Tetris well ready, with some sort of T-Spin ready to be used, and starts zone when you are able to do at least one of them. It is also important to note that you would want to stack high (but not too high in case of a drought), to use both more zone time to clear lines and plan out a high zone line-clear attack.
- Templates
Templates are well, use templates in the building. TST towers and ST stacking are common.
Tetrises on the save
In some circumstances, your zone attack will lose to your opponent, maybe by a large amount. If you can see this happening, start doing Tetrises to replenish your zone charges. Tetris Effect: Connected is one of the few games where Tetris has some benefits over T-Spins. Since Tetris clears 4 lines in a row and has no need to soft drop, it makes the perfect candidate to make zone charges fast.
Zone strategy
The zone strategy usually shifts depending on both your opponents’ speed and efficiency, as well as what progression you are in. Generally, you would want to use a full zone whenever possible, as it grants you a higher bonus and more time to plan things out. In this full zone, you want to stack it with Tetrises and T-Spins, and generally finish it off with a high zone line clear. Anything above 18 is good, and anything at or above 20 is great. In addition, you can also zone when being sent too much garbage; you’d want to do this if you’re about ⅔ to ¾ of the way up and are receiving incoming garbage you cannot properly deal with there.
- In Phase 1, there is no best strategy, just use zone whenever you are getting pushed too high up by your opponent. This might result in a weaker zone attack that your opponent can easily overtake, but because of how quick zone charging is here, you would usually have another zone attack ready to counter. If you are able to get a good pre-zone setup and a full zone meter, then a high-zone line clear attack can be devastating if your opponent can’t counter it. Pairing this during the phase change can help.
- Entering and during Phase 2 would be the major focus of a lot of high zone line clears, which is discussed above. Because of the change in garbage, your Tetris wells might start shifting around, so knowing how to downstack would help.
- Phase 3 makes zoning trickier. Garbage gets extremely messy, and the importance of making T-Spins out of that garbage becomes key. Efficient downstacking becomes a plus, as the combos can add some extra damage to your attack. Feel free to use zone whenever you are high up, as that can avoid top-outs/block-outs, and if you can pull off a good downstack, get you back to a more leveled playing field. If your opponent is higher up than you and you have the advantage in the amount of zone, do use it to send a stronger attack — since it takes longer to charge zone and weaker zones are so short, your opponent would have a harder time countering any of it.
(ST, TST tower)
In modes like Ultra and Score Attack, being able to efficiently pull off Tetrises and T-Spins is key. They award the most points, and each mode has an inevitable end (in Ultra, it’s the time limit, and in Score Attack, it’s the ever-increasing speed that would get you). There are some strategies that are good for scoring efficiently. In Ultra, since the limit is time, playing faster can help boost your score up.
9-0 Stacking
How a lot of people who start playing the game stack their wells, 9-0 stacking is an efficient way of setting up Tetrises. It’s great to start off with, and there are some ways to add T-Spins to the mix via Kaidans. 9-0 Stacking is also a good way to transition to ST Stacking (explained below).
6-3 Stacking and freestyle T-Spins
6-3 Stacking is extremely useful in both Score Attack and Ultra, as it provides far more options to set up T-Spins. Under Pattern Recognition, you can see some examples of T-Spin Setups created using a flat 6-3 Stack.
ST Stacking
Since these game modes have an emphasis on point efficiency (in Ultra you want to score as many points in 3 minutes, and in Score Attack you want to score as many points per line), T-Spin Doubles are extremely important, as they can earn the same number of points as a Tetris, while only clearing half the number of lines.
A popular, albeit difficult-to-master strategy is ST Stacking. Although the name implies the use of the S Tetrimino for the T-Spin setups, the mirrored variant with the Z Tetrimino is also equally effective and more popular. This setup is similar to a Kaidan, in which you use a S or Z Tetrimino to create a donation T-Spin Double, but you continue to stack them repeatedly.
To avoid confusion, this guide would use the Z Tetrimino vertically instead of the S Tetrimino. If you want to use the S Tetrimino instead, you can mirror the setups. We’ll split ST Stacking up into 3 parts: the opener, the midgame, and the reset.
- In the opener, a Z is placed vertically against the right wall. The center and left parts of the board are built up so a T-Spin hole can be created using the Z Tetrimino. It is important to use two T-Tetriminos and one Z Tetrimino in this area, to avoid having a jagged board and to even out the number of Tetriminos used.
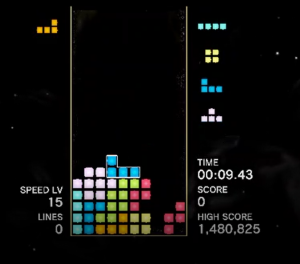
- In the midgame, a T-Spin Double is performed in the T-Spin hole. Afterward, another Z is placed on the right wall on top of the leftover red Tetriminos. The center and left of the board should continue to be built up with the other Tetriminos so that the T-Spin will continue clearing lines. The left is usually filled with I, O, and J Tetriminos while the center is usually filled with S and L Tetriminos. The process of placing the Z on the wall, performing the T-Spin Double, and rebuilding the left and center can be repeated several times to score massive points!
If the stack starts getting dangerously high, you can place I Tetriminos in columns 8 and 10 to score Tetrises and lower the stack.

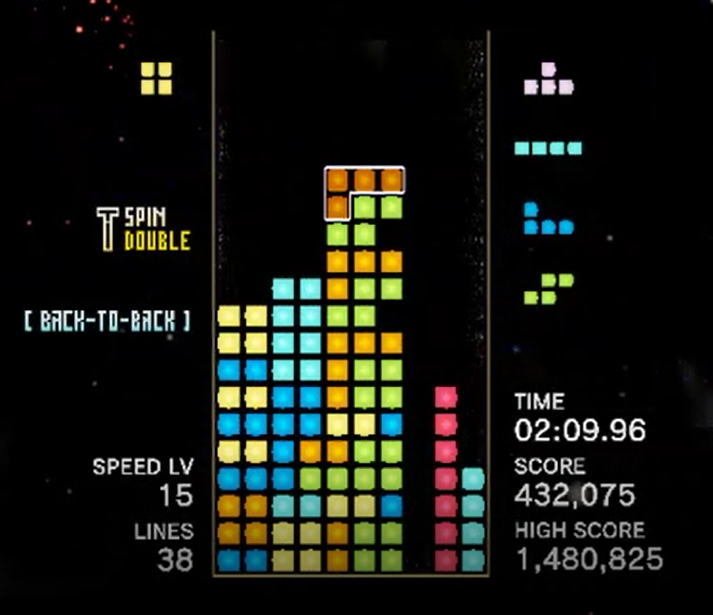
Use Tetrises to lower your board and the number of red Tetriminos on the right side!
After continuing the pattern of T-Spin Doubles and clearing Tetrises to downstack, you will eventually reach a point where the left and center are not high enough for the T-Spins to clear lines. This leads to the reset, which will help raise your left and center significantly.
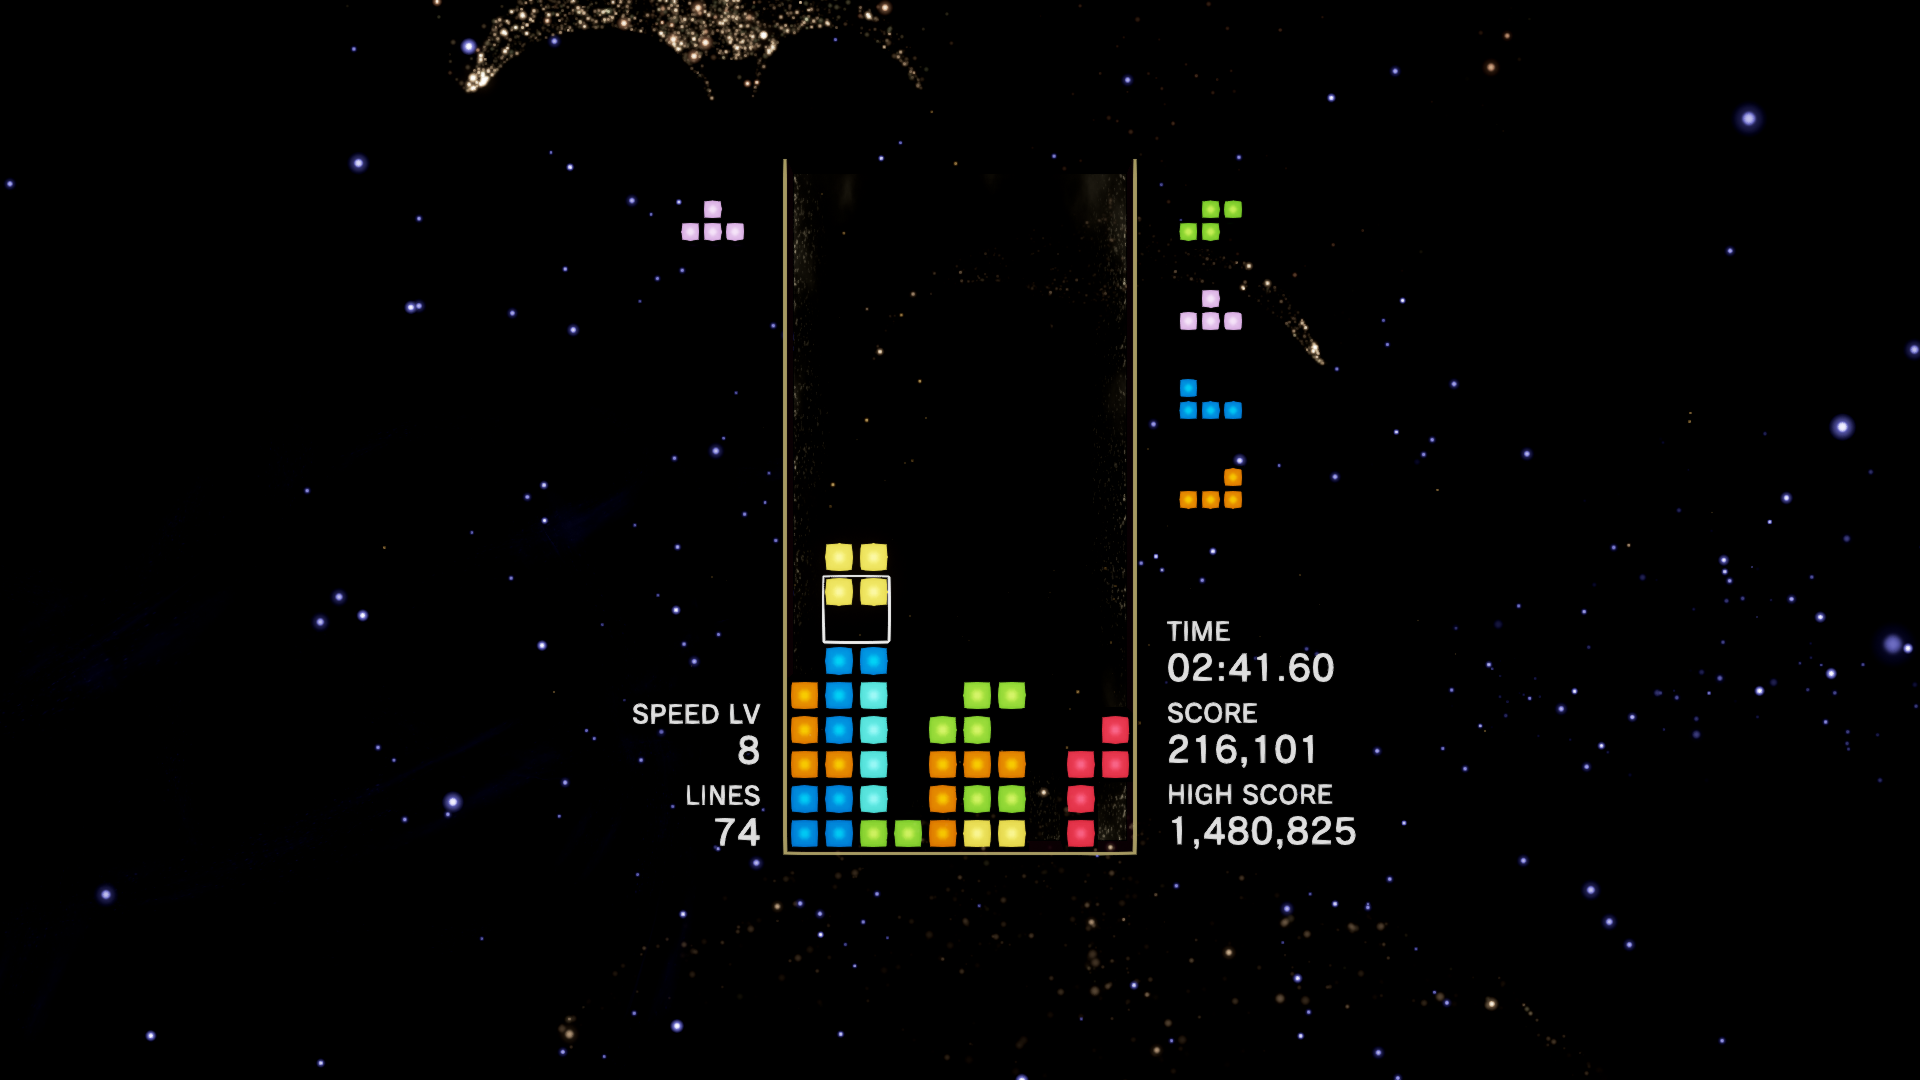
In this example, there are two T Pieces coming up, and the left side is not built high enough to accommodate another T-Spin. Here is where you reset
- To reset, you would set a total of two T and Z Tetriminos on the left and center of the board. This would make your board get taller significantly, so either reset when the board is low, or if you have Tetrises ready to lower the stack. Performing a reset allows you to return to the midgame, which means that you can theoretically ST stack forever!
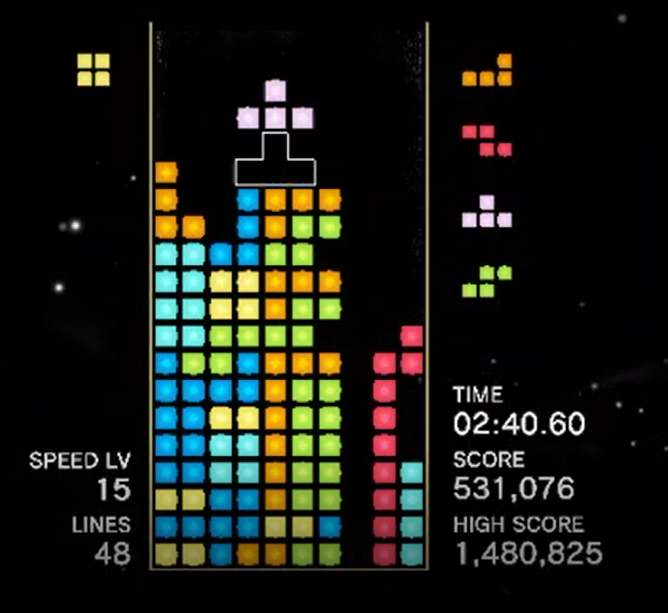
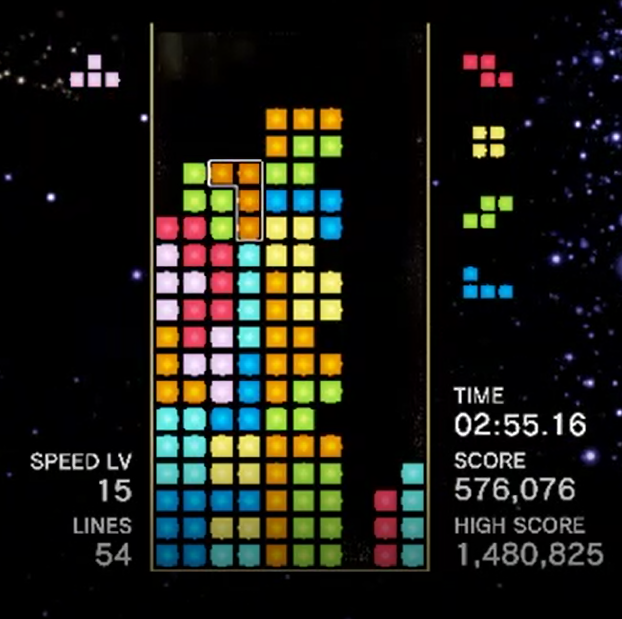
There are instances where if you know a reset is bound to happen, you can do so earlier than normal. However, this does put you at a higher risk of topping out, so be wary.
ST Stacking is a complex setup. To see a more complete guide on how to ST Stack, go check out Supershocky’s ST Stacking Guide.
An even more complicated, yet more rewarding, setup is the Infinite T-Spin Triple Tower or infinite TST for short. This is not recommended for Score Attack, as it becomes increasingly more difficult to manage the board as the speed increases, as well as managing in 20G+ speeds. For Ultra, this can be a rewarding strategy to get a higher score than normal ST Stacking/Freestyle T-Spins.
A board can be split into two sections when doing infinite TST: A 4-wide well that contains 3 Tetriminos (Well) in the shape of an upside-down L, and a 6-wide stack that the majority of Tetriminos would be placed (Stack). Managing both sides is important when going for infinite TST.
A good way of starting would be to use DT Cannon, as that gives you 3 Tetriminos in the outermost 4 columns.
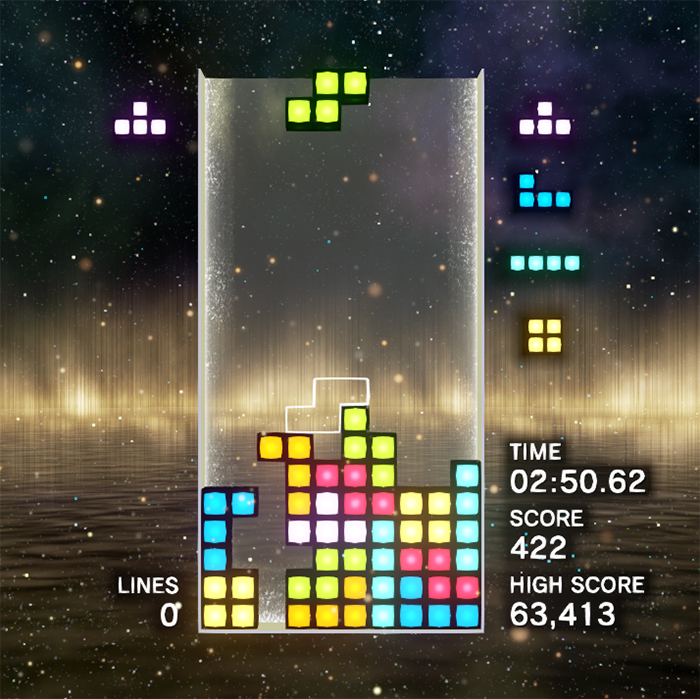
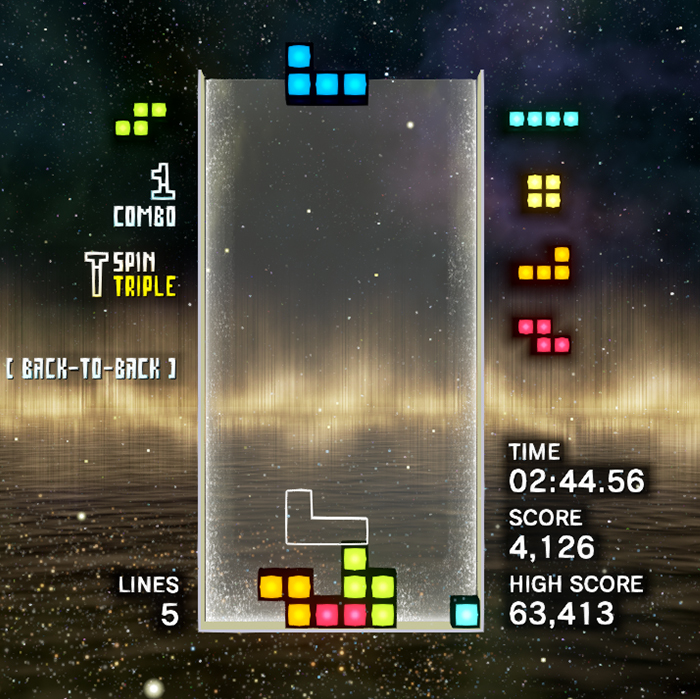
A DT Cannon leaves 3 Residue on the 4 left columns, perfect for starting an Infinite TST
Once you have three residue on the side, you can stack L, I, Z on the left side of the 4-wide gap, and stack S, L on the right side of the gap.
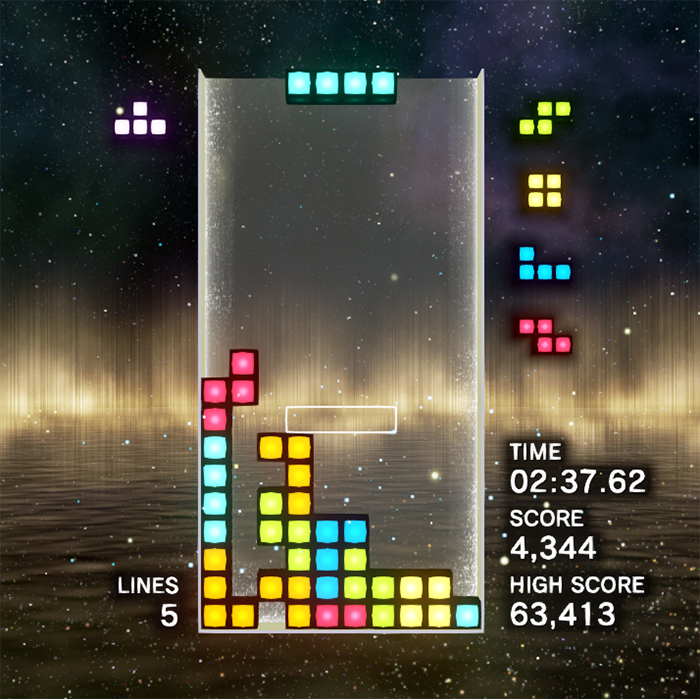
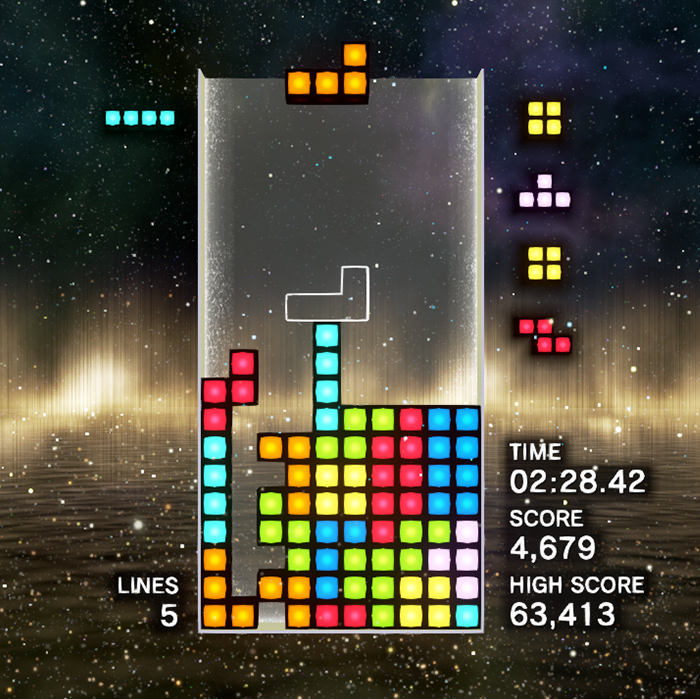
After placing those Tetriminos on the side, you can fill the board to get two T-Spin Triples
This setup gives you two T-Spin Triples. Clearing them leaves you with a TST shape, and the possibility to stack another, as seen below. Place a J on the left of the gap, and an I, L on the right.
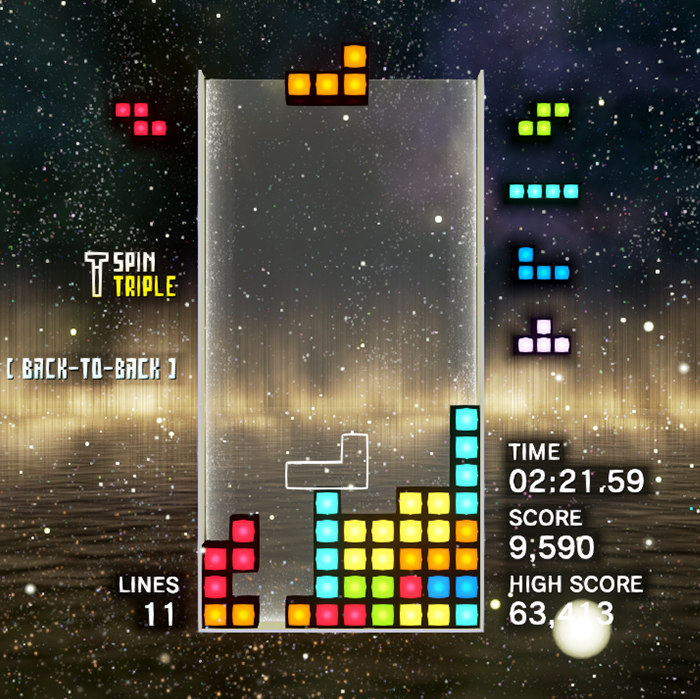
After those Tetriminos are placed, and the rest of the stack is filled, you get two more T-Spin Triples
Once you have done those T-Spins, you would return back to where you started. This lets you repeat this loop, as since a T-Spin Triple clears more Tetriminos than what a 7-bag can fill, this cycle can be repeated as many times as you want, as long as you don’t build too high.
Clearing the T-Spin Triples brings you back to where you started, completing the cycle!
There are many other ways to set up the tower, and different ways to skim lines if your board is too high. For more information about this and Infinite TST in general, check out https://harddrop.com/wiki/Infinite_TST.
We hope you found this Advanced Guide useful! We would love to say an extra big thank you to all of the members of our community who contributed to this guide. If you would like to learn more about Tetris Effect gameplay, join in on discussions, and ask other top-level players about some of the techniques in this guide, please join us on Discord!
If you’ve got an idea for another Community project or guide we could write, please let us know
- Commando – Finesse, proofreading/formatting, image uploads
- Eclipse#5783 – Pattern Recognition Intro, Enabling IRS/IHS, minor formatting
- Davotigger – IRS/IHS
- Kibi Byte – top-out/block-out nitpick
- Adventium_ – Impossibilitris guide, proofreading
- Yoshimi – Fixed some strange wordings, IHS restrictions
- Ferox – Pattern Recognition, ZB tips and SA/Ultra stacking
- Mactonya – 20G and misc. Sections
- Taco – Donations section
- Supershocky – ST stacking section
